Monday, August 29, 2011

15 Minute DIY Vintage Suitcase Coffee Table


I love, LOVE vintage suitcases. What is better than a vintage suitcase......

A Vintage Suitcase Coffee Table


This project is fairly cheap and takes less than 15 minutes to do!

Let's get to it...


What You'll Need:
Power Drill
Vintage Suitcase (Preferably one made of wood. Plastic works too!)
Measuring tape or ruler
Straight (or Angle) Top Plate Hardware (4)
4 inch Tapered Table Legs (4) 
Optional: Spray Paint or Paint for the Legs

*You can use longer table legs! I used 4" table legs for this project*
*You can use straight or angle plates that are available at most hardware stores: Lowes, Home Depot, Ace Hardware, etc. 

Straight Plates: legs will stand straight
Angle plates: legs will angle outward


Begin by turning the suitcase upside down and placing a piece of hardware on each corner
Make sure each Top Plate is bubble side up:

*If you are using angle plates make sure the leg hole is pointing in the right direction before drilling the screws in.*


Measure the hardware and mark its spot, so each piece is in the same spot.
I placed my Top Plate 4 inches from the bottom of the suitcase:


Screw each Top Plate down. Once you have done this screw in the legs and turn it over:


YOU'RE DONE!!


How easy was that!?

Feel free to ask questions and post pictures in the comments section!

Enjoy!!


This project was inspired by http://www.designsponge.com/

Wednesday, August 24, 2011

Simple DIY Eye Dropper Drawings - Fishing Line Photo Hanger


This project makes anyone look like a seasoned artist. One of my favorite things about this project is that there are hundreds of different ways to go about it! Once your ink drawing is finished you can paint it, watercolor it, or use ink pens to detail it. Don't think about it too much and have fun with it!


What You Will Need:
Watercolor Paper (Mine is Cold Press 140lb Paper)
Black Liquid Ink with an Eye Dropper
Toilet Paper


Take out a piece of Watercolor Paper and cut it in half.
You can use the entire sheet if you wish. I cannot draw to save my life, so I cut my sheet in half. Using a smaller sheet doesn't seem so scary!


Take the dropper and begin to draw with it. Draw something you know or let your hand flow freely along the paper. Don't think about it too much and don't worry if you get a lot of ink on it. It will look really cool in the end if it's blotted.


Once you are done drawing, quickly put a piece of toilet paper over your drawing to soak up the loose ink.


Lift the toilet paper off.
My drawing didn't change very much since I didn't have a lot of ink blots on my paper.


Allow the drawing to dry, then you can add pen, watercolor, or paint to it to jazz it up a bit.


Here are some drawings I did:


I used pen and watercolor to spruce mine up:


You can also use some fishing line, clothespins, and tacks to make a fishing line style photo hanger.

Super fun!


ENJOY!!


This blog was inspired by: 

Saturday, August 20, 2011

Easy and Unique DIY Envelopes for thank you notes and handwritten letters!


This DIY envelope project is so quick and easy. I love it! 
I mean, how cool are these envelopes!?!


What You'll Need:
Envelope (small or large)
Glue Stick
Scissors
Pen
Magazine

I used an old LIFE magazine because I love the old photos in them.


Let's do it!

Step One.

Take an envelope and unfold it.
Be careful not to rip it!
Feel free to use a large or small envelope. 

I'm using a small one here:


Take a page out of your magazine:


Lay the envelope over the picture and trace the envelope onto the paper:


Cut it out:


Place the side you like face-down and begin folding the sides in:

Fold the right and left sides in.
The tips of the triangles should NOT touch.


Fold the bottom lip up. The bottom lip is the triangle with a flat top:


Use a regular envelope or a piece of paper to place under the side triangles, so you don't get any glue on the inside of the envelope. Glue along the edge of the side triangles.
Press them to the bottom lip:


Once you glue the sides, fold the bottom up and press it down to make sure it sticks. Then, fold the top down. Don't glue the top since this is the envelope's flap!


YOU'RE DONE!


Snail Mail Tips:
Put a label on the envelope so the post office can clearly see where it's going. 
Use a heavier paper so your envelope doesn't rip during the mailing process. 

ENJOY!!

Wednesday, August 10, 2011

DIY Repurpose Worn Out Old Flats into Cute New Dress Shoes!


This is a really quick and inexpensive way to dress up a pair of old flats! 

I bought a pair of black flats on clearance for $8.00 and now they look like this:


What You Need:
Mod Podge - Matte
Fabric
Paint Brush
Scissors
Pair of Flats or High Heels
(Look for shoes in the thrift stores!)


Start by laying the fabric centered over one shoe.
Cut a large piece, so it extends past all sides of the shoe.

**The photo below shows the heel of my shoe, so you can see where the shoe will lay under the fabric. Make sure you cut enough fabric to cover the back of your shoe!**


Trim the edges of the fabric around the entire shoe:


Then, cut a slit from the back to a 1/2 of an inch from the top of the shoe's hole:


Apply the mod podge to the tip of the shoe. Make sure you use a good amount:


Lay the cut fabric over the shoe and press it onto the shoe while spreading the wrinkles out.
Don't worry about extra fabric hanging over. We will take care of that later.

My shoes have pleats, so they'll have a wrinkled look when they're finished.
I would recommend using shoes without pleats for this project. 


Once you have the front on, mod podge the sides and press the fabric down all the way to the back of the shoe. Be sure to pull it tight, but do it softly. 
Do this on both sides:


After you're done with the sides, begin to mod podge the back of the shoe:


Start by mod podging the right piece of fabric to the shoe.
Then take the left piece and fold it into itself, so the raw edge doesn't show, then glue it down over the right piece

If you are having trouble bust out your glue gun!


It should look something like this:


After you do the back of the shoe,
cut the extra fabric around the shoe's hole down to 1/2" all the way around:


 Now cut small slits in the fabric.
This will help you when you're gluing them down.


Mod Podge the inside of the shoe where the slits will sit and glue the slits themselves.
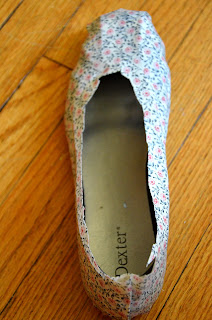
Then, press the pieces of fabric down into the shoe.

It should look like this:


When you are done, paint a coat of Mod Podge over the entire shoe.
Make sure you cover it really well.  
Let it dry completely before trying it on or cutting any extra fabric or strings off.


YOU'RE DONE!


Repeat for the other shoe.
If you're having trouble with the fabric,
get your glue gun out and glue down the areas that are giving you trouble. 

Works like a charm.

Check out this fresh pair of cute flats!


Enjoy!