Friday, September 30, 2011

No-Sew T-Shirt Infinity Scarf Tutorial


This is probably one of the easiest DIY projects I have posted.
Not only is it really easy, but it also only takes about 10 minutes to do.
What could be better than that?


What You'll Need:

An Old T-Shirt that is XL; go to a thrift store and purchase a large or extra-large shirt that doesn't have a logo on the front or back. If you choose a shirt that has a hard logo your scarf may look stiff in the end. 

Scissors

That's It!


Let's Begin!


Start by cutting off the hem along the bottom of the shirt:


Then cut the bottom of the shirt into 1" or 1 1/2" strips. It is okay if they are jagged:

Note:
The more strips you have the thicker your scarf will be.
Get creative and use two or three shirts that are different colors!!!


Now Comes the Fun Part!

Hold about 4-5 strips together in your hand like this...


 Begin to stretch them out. As you stretch out the strips they will begin to curl in:


If you feel like your strips aren't curling enough you can do them one by one.
You want to make sure they have all stretched the same size or close to the same size:


Your strips should look something like this now:


 Cut out a piece of fabric that is about 1" or 1 1/2" wide.
We will use this to tie the strips together:


 Gather the strips and begin to wrap the extra piece of fabric around one end:


 Once you have wrapped it all the way knot it and then cut off the extra.
Once cut, hide the knot under the other wrapped fabric:


YOU'RE FINISHED!!


Here is one way to wear an infinity scarf.
Begin by putting the scarf on, so it hangs around your neck:

 Twist the scarf once, so you make an 8 or an infinity sign, then put it over your head:


ENJOY!!!!

Tuesday, September 06, 2011

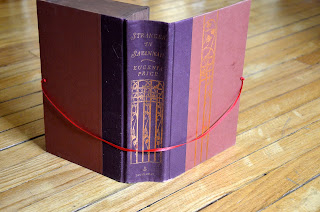
How to turn an old book into a secret book box


I think these secret book boxes are pretty neat.
You can keep it simple or you can add sections to it if you're looking for a more organized look. 
I chose to keep it simple since I'm going to store paintbrushes and craft tools in mine.


What You'll Need:
- A Large Old Book (You will need one that is at least 2 1/2 inches thick. I got mine at the thrift store. They have 100's of huge old books there. Get your book there.)
- Hot Glue Gun and Glue Sticks
Knife (You can use a kitchen knife. I used a crafting knife here)
- 2, 1/8" Thick 3X2 pieces of wood (I used 1/4" thick wood since they didn't have 1/8" thick wood at Lowes. My book sticks up a little bit, so I drilled a hole in it and laced a piece of ribbon through it to hold it together. How-To Below)
- Mini or Regular Hand Saw (I got mine for $3.50 at Lowes)
- Ruler

Optional:
-Paint to decorate it
- If you want to add a ribbon you'll need a drill and 1/8" bit to drill a hole
- Any color ribbon


Let's Begin:

Start by cutting out the inside of the book.
Use a regular kitchen knife or a craft knife to cut out the book seam:


Next, measure each corner 1/8" in.
You are measuring where your box is going to go:


*If your book doesn't have a paper lining, you can mark 1/8"-1/4" in from each edge of the book*

Measure from the mark you made on the top left side all the way down to the bottom left side.
This is how long you will need your side pieces of wood to be.
Cut two side pieces of wood that are what you just measured.


Now that you have your side pieces cut we will use a hot glue gun to glue them on.
Put a decent amount of hot glue along both of the bottom pieces of wood and press them down to set them. Do one at a time. It should look like this when you are done:


Now for the Top and Bottom:


* Do this for the top and bottom pieces. Mine is already cut here because I made mine too big and had to cut it again. Don't make my mistake. By this time you are becoming to understand that it's not easy to saw wood. Ouch.*

Now glue the top and bottom pieces on:


Mine aren't perfect. Yours don't have to be either!

Go along the entire box and fill in any spaces with hot glue.
Next, glue along the bottom of each piece of wood, inside and outside.


YOU'RE DONE.....

Unless you want to put a ribbon on your book box so you can tie it shut.

Mark a spot on the cover of your book that is 1/2 way in between the top and bottom of it.


Do this to the back of the book too.

Get your ribbon and cut a piece that is at least 20 inches long.
You can always cut any extra you have off.
Thread the ribbon through both holes from the bottom and then tie a knot
 on each end so it doesn't come back through the hole:


Pull the ribbon to the back to open the book:


Now you're really finished!


ENJOY!!

Friday, September 02, 2011

Over-Sized Infinity Scarf Tutorial, No-Sew Option Available!


I love scarves! Who doesn't, right!? Big ones, little ones, colorful ones, plain ones.....

 This tutorial will show you how to make your own over-sized scarf! 


You can also wear it as a hood: 


Let's begin...

What You Will Need:
- 2 Yards of Fabric
Anything that isn't sheer or too lightweight. Bedsheets work perfectly!! If you want a really chunky look, get a fabric that is thick and heavy like cozy flannel. Want something lighter? Stick with a cotton blend or any fabric that's thin and lightweight.

- Sewing Machine

No-Sew Option: instead of sewing you can use Heat and Bond Hem regular strength and an iron. You will use the same instructions as sewing, but with tape and an iron.


And we're off!


Begin by cutting out two pieces of fabric that are:
32 inches long X 34 inches wide 


Put the two pieces of fabric together RIGHT SIDE FACING EACH OTHER.
*Right Side is the side with the colored pattern on it*

Sew both 34" sides together using a 1/2 inch hem.
Always use a back-stitch to secure what you are sewing.


You should have one piece now that looks like a big circle.


Now we are going to hem up what you just sewed.

Start by laying your scarf flat. 


This will clean up your scarf, so you don't have any raw edges exposed.

If you're using Heat and Bond:
Lay the tape under the fold and iron it to bond the fabric together.

Now sew what you just pressed.
Sew close to the inner edge of the hem:


Repeat that step on the other side.

When you're done, the top and bottom hems should look like this when your scarf is turned right side out:


YOU'RE FINISHED! 


Enjoy!