
This tutorial will show you how to make your own shirt, t-shirt dress, and tank top.
I was SO happy when I made my first shirt! I mean really, what is better than making your own clothes. I don't know what is.
The best thing about this project is that you don't have to hem anything! Stretchable fabrics take their own shape, so hemming isn't necessary. Unless you want to of course.
Here are some of the dresses and shirts I have made:


Let's Get To It!!
What You Will Need:
-A Stretchable Bed Sheet or Stretchable Fabric: no matter what you use make sure it stretches! Thrift stores always have jersey cotton bed sheets. I would recommend looking there first. More fabric for your money!
-A Stretchable Bed Sheet or Stretchable Fabric: no matter what you use make sure it stretches! Thrift stores always have jersey cotton bed sheets. I would recommend looking there first. More fabric for your money!
-Your Favorite Stretchable T-shirt or Tank: a shirt/tank that stretches is key!
-Scissors
-Sewing Machine
-Sewing Machine
-Push Pins
Optional:
Hand Sew


Note Before We Start:
Make sure the fabric and shirt/tank is stretchable!
Read all of the instructions before you start this project.
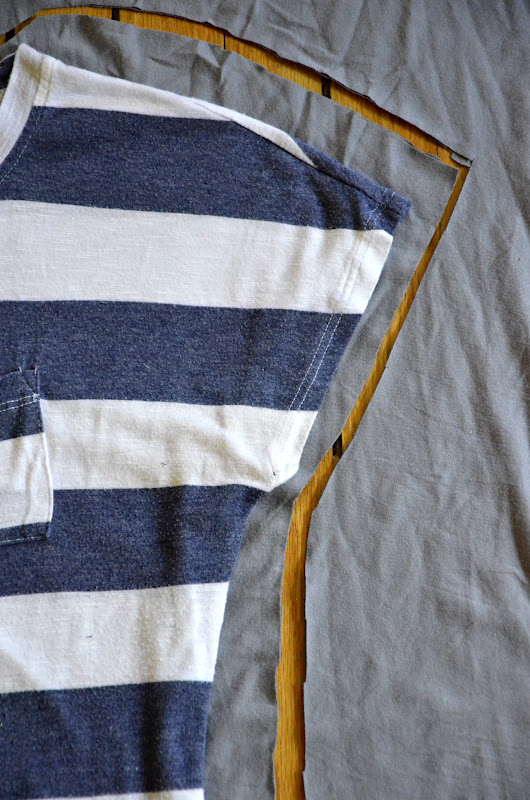
1. Fold your fabric in half. Smooth it out.

2. Lay your T-Shirt over the fabric.
To Make a Dress
Measure from your shoulder down to where you want your dress to end.
Add the additional inches to the bottom of the shirt.
When cutting out your dress, cut a few more inches away from the shirt to give room for your hips!
To Make a T-Shirt or Tank
Add a few inches of fabric to the bottom of your shirt.
You can always cut off extra fabric if it is too long when you're done.
Note:
I like to use the part of the bedsheet that is hemmed at the bottom so my shirt is hemmed at the bottom. Saves me time.
Don't worry if you don't have a hemmed edge. That's why we are using stretchable fabric.
It takes its own shape, so you don't have to hem anything!


3. Starting at the bottom cut around your shirt until you get to the middle of the neckline
T-Shirt and Tank Top Makers: Cut 2" away from your shirt
Dress Makers: Cut 3" away from your shirt

4. Remove your shirt.
Fold the shirt over and continue cutting
This will ensure both sides are even


5. After you cut your shirt out, turn the right-sides so they are is facing in
The wrong side should be facing outward

6. Line up your shirt so all sides and corners are matching

8. We aren't to the point of sewing yet, but I wanted to show you where you will put your push pins.
Pin your shirt where the black lines are below:


9. Now we sew. Sew where the black lines are on the photo below.
Sew 1/2"-1" from the edge of the shirt
Do not sew where your body parts are going to be: waist, armholes, neck.

Here is a closer view of the shoulders:

The photo below shows where I sewed


10. Fold your shirt right-side out
Try it on
If it is too big, hem the sides in another 1/2"-1"
YOU'RE FINISHED!!!
Unless you want to make it a swoop neck like mine...

1. Start by putting the shoulder seams together and laying the shirt flat


You will notice that the sleeves will be touching.


2.Smooth out the shirt so you get a clean cut
In the photo below the top left of the shirt will be my front, the top right will be the back of my shirt
In the photo below the top left of the shirt will be my front, the top right will be the back of my shirt

3. Cut a scoop out of the top left.
Note:
The closer you cut to the shoulder seam the wider the neck will be.
For example: if you cut close to the shoulder seam you will get an "over the shoulder look", but if you cut a few inches away from the shoulder seam your neckline will not be as wide and will fit more like a t-shirt.
I would start by going 3-4" away from the shoulder seam, then cut 2-3 inches down and over. If you want more scoop you can always cut more off.

4. Do the same to the top right side, except you won't cut as far down this time.
This is the back of the shirt. You don't want as big of a scoop as the front.
Cut 1-2" down and over until you hit the end of the shirt

Ta-Da!
Use scissors to fix any jagged edges.
You can also pull on the shirt a little to get the material to roll a bit

Now, YOU'RE FINISHED!!!

Try it on an ENJOY!!

I love you this post, most of ladies looking for such great information, thanks:)
ReplyDeleteI love your instructions! they are so easy to follow! the pictures help, too. I think it inspires those who aren't so confident in their skills to take the leap & do it!
ReplyDeleteThis is just great! I do really enjoy this kind of blog.
ReplyDeleteI was very pleased to find this site.I wanted to thank you for this great read!!
Design a Tshirt
This literally inspired me so much, I might start doing something with my life.
ReplyDeleteSimply wanna state until this will be handy, Many thanks when deciding to take your time and energy to create this specific.
ReplyDeleteThis was awesome.. You have really clear instructions, photos, ...EXCELLENT!! thank you so much... Heading out to thrift shop today.. thanks again. Susan ( wunda)
ReplyDeleteThanks for the FANTASTIC post! This information is really good and thanks a ton for sharing it :-)
ReplyDeleteMade to Measure Dress Shirts
Nicely presented information in this post, I prefer to read this kind of stuff. The quality of content is fine and the conclusion is advantage.free social bookmarking
ReplyDeletefitness shirts
I love this. Thank you!
ReplyDeleteso happy to find good place to many here in the post, the writing is just great, thanks for the post. In this game sims 4 skill cheats you can fitness, it's available on Xbox one.
ReplyDeleteThis is great content for your readers
ReplyDeleteAny way I’ll be subscribing to your feed and I hope you post again soon.
ReplyDeleteBig thanks for the useful info.
ReplyDeleteCommon outings let us discuss simplest way to thanks a ton for your personal efforts.
ReplyDeleteGreat job for publishing such a nice article. Its useful for us. Thanks a lot... MM
ReplyDeleteIt was definitely informative article you've done. This site is very useful. Thank you... MM
ReplyDeleteWonderful website. Plenty of useful information here. And certainly, thank you... MM
ReplyDeleteEnjoyed reading the article above, the article is very interesting and effective... MM
ReplyDelete
ReplyDeleteYou have made my day! Thanks again!
ReplyDeleteI was reading through some of your articles on this website and I believe this website
ReplyDeleteI’m writing on this topic these days, , but I have stopped writing because there is no reference material.
ReplyDeletewe all understand media is a fantastic source of information
ReplyDeleteBut hey, If your looking for awesome site Just click the following link below
ReplyDeleteWhat i do not understood is in fact how you are